A few months ago, a nostrich was switching from iOS to Android and asked for suggestions for #Nostr apps to try out. Derek Ross (npub18am…p424) offered the following as his response:
Yes. #Android users are fortunate to have some powerful Nostr apps and tools at our disposal that simply have no comparison over on the iOS side. However, a tool is only as good as the knowledge of the user, who must have an understanding of how best to wield it for maximum effect. This fact was immediately evidenced by replies to Derek asking, "What is the use case for Citrine?" and "This is the first time I'm hearing about Citrine and Pokey. Can you give me links for those?"
Well, consider this tutorial your Nostr starter-kit for Android. We'll go over installing and setting up Amber, Amethyst, Citrine, and Pokey, and as a bonus we'll be throwing in the Zapstore and Coinos to boot. We will assume no previous experience with any of the above, so if you already know all about one or more of these apps, you can feel free to skip that tutorial.
So many apps...
You may be wondering, "Why do I need so many apps to use Nostr?" That's perfectly valid, and the honest answer is, you don't. You can absolutely just install a Nostr client from the Play Store, have it generate your Nostr identity for you, and stick with the default relays already set up in that app. You don't even need to connect a wallet, if you don't want to. However, you won't experience all that Nostr has to offer if that is as far as you go, any more than you would experience all that Italian cuisine has to offer if you only ever try spaghetti.
Nostr is not just one app that does one thing, like Facebook, Twitter, or TikTok. It is an entire ecosystem of applications that are all built on top of a protocol that allows them to be interoperable. This set of tools will help you make the most out of that interoperability, which you will never get from any of the big-tech social platforms. It will provide a solid foundation for you to build upon as you explore more and more of what Nostr has to offer.
So what do these apps do?
Fundamental to everything you do on Nostr is the need to cryptographically sign with your private key. If you aren't sure what that means, just imagine that you had to enter your password every time you hit the "like" button on Facebook, or every time you commented on the latest dank meme. That would get old really fast, right? That's effectively what Nostr requires, but on steroids.
To keep this from being something you manually have to do every 5 seconds when you post a note, react to someone else's note, or add a comment, Nostr apps can store your private key and use it to sign behind the scenes for you. This is very convenient, but it means you are trusting that app to not do anything with your private key that you don't want it to. You are also trusting it to not leak your private key, because anyone who gets their hands on it will be able to post as you, see your private messages, and effectively be you on Nostr. The more apps you give your private key to, the greater your risk that it will eventually be compromised.
Enter #Amber, an application that will store your private key in only one app, and all other compatible Nostr apps can communicate with it to request a signature, without giving any of those other apps access to your private key.
Most Nostr apps for Android now support logging in and signing with Amber, and you can even use it to log into apps on other devices, such as some of the web apps you use on your PC. It's an incredible tool given to us by greenart7c3 (npub1w4u…0jr5), and only available for Android users. Those on iPhone are incredibly jealous that they don't have anything comparable, yet.
Speaking of greenart7c3 (npub1w4u…0jr5), the next app is also one of his making.
All Nostr data is stored on relays, which are very simple servers that Nostr apps read notes from and write notes to. In most forms of social media, it can be a pain to get your own data out to keep a backup. That's not the case on Nostr. Anyone can run their own relay, either for the sake of backing up their personal notes, or for others to post their notes to, as well.
Since Nostr notes take up very little space, you can actually run a relay on your phone. I have been on Nostr for almost 2 and a half years, and I have 25,000+ notes of various kinds on my relay, and a backup of that full database is just 24MB on my phone's storage.
Having that backup can save your bacon if you try out a new Nostr client and it doesn't find your existing follow list for some reason, so it writes a new one and you suddenly lose all of the people you were following. Just pop into your #Citrine relay, confirm it still has your correct follow list or import it from a recent backup, then have Citrine restore it. Done.
Additionally, there are things you may want to only save to a relay you control, such as draft messages that you aren't ready to post publicly, or eCash tokens, which can actually be saved to Nostr relays now. Citrine can also be used with Amber for signing into certain Nostr applications that use a relay to communicate with Amber.
If you are really adventurous, you can also expose Citrine over Tor to be used as an outbox relay, or used for peer-to-peer private messaging, but that is far more involved than the scope of this tutorial series.
You can't get far in Nostr without a solid and reliable client to interact with. #Amethyst is the client we will be using for this tutorial because there simply isn't another Android client that comes close, so far. Moreover, it can be a great client for new users to get started on, and yet it has a ton of features for power-users to take advantage of as well.
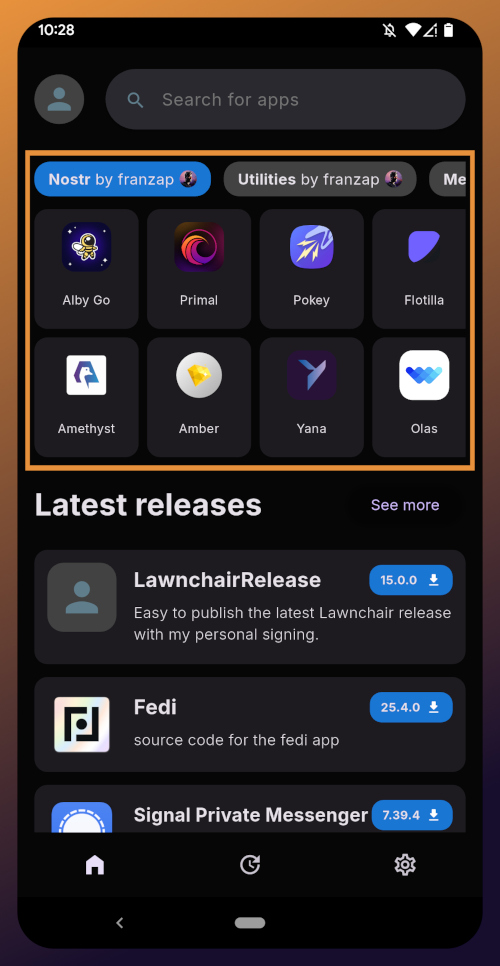
There are plenty of other good clients to check out over time, such as Coracle, YakiHonne, Voyage, Olas, Flotilla and others, but I keep coming back to Amethyst, and by the time you finish this tutorial, I think you'll see why. VitorPamplona (npub1gcx…nj5z) and others who have contributed to Amethyst have really built something special in this client, and it just keeps improving with every update that's shipped.
Most social media apps have some form of push notifications, and some Nostr apps do, too. Where the issue comes in is that Nostr apps are all interoperable. If you have more than one application, you're going to have both of them notifying you. Nostr users are known for having five or more Nostr apps that they use regularly. If all of them had notifications turned on, it would be a nightmare. So maybe you limit it to only one of your Nostr apps having notifications turned on, but then you are pretty well locked-in to opening that particular app when you tap on the notification.
#Pokey, by KoalaSat (npub1v3t…yvjh), solves this issue, allowing you to turn notifications off for all of your Nostr apps, and have Pokey handle them all for you. Then, when you tap on a Pokey notification, you can choose which Nostr app to open it in.
Pokey also gives you control over the types of things you want to be notified about. Maybe you don't care about reactions, and you just want to know about zaps, comments, and direct messages. Pokey has you covered. It even supports multiple accounts, so you can get notifications for all the npubs you control.
One of the most unique and incredibly fun aspects of Nostr is the ability to send and receive #zaps. Instead of merely giving someone a 👍️ when you like something they said, you can actually send them real value in the form of sats, small portions of a Bitcoin. There is nothing quite like the experience of receiving your first zap and realizing that someone valued what you said enough to send you a small amount (and sometimes not so small) of #Bitcoin, the best money mankind has ever known.
To be able to have that experience, though, you are going to need a wallet that can send and receive zaps, and preferably one that is easy to connect to Nostr applications. My current preference for that is Alby Hub, but not everyone wants to deal with all that comes along with running a #Lightning node. That being the case, I have opted to use OVO (npub1h2q…w8ch) for this tutorial, because they offer one of the easiest wallets to set up, and it connects to most Nostr apps by just copy/pasting a connection string from the settings in the wallet into the settings in your Nostr app of choice.
Additionally, even though #Coinos is a custodial wallet, you can have it automatically transfer any #sats over a specified threshold to a separate wallet, allowing you to mitigate the custodial risk without needing to keep an eye on your balance and make the transfer manually.
Most of us on Android are used to getting all of our mobile apps from one souce: the Google Play Store. That's not possible for this tutorial series. Only one of the apps mentioned above is available in Google's permissioned playground. However, on Android we have the advantage of being able to install whatever we want on our device, just by popping into our settings and flipping a toggle. Indeed, thumbing our noses at big-tech is at the heart of the Nostr ethos, so why would we make ourselves beholden to Google for installing Nostr apps?
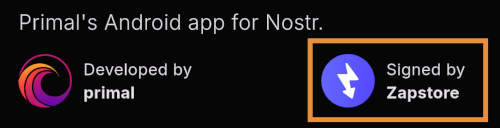
The Zapstore (npub10r8…t2p8) is an alternative app store made by franzap (npub1wf4…dgh9) as a resource for all sorts of open-source apps, but especially Nostr apps. What is more, you can log in with Amber, connect a wallet like Coinos, and support the developers of your favorite Nostr apps directly within the #Zapstore by zapping their app releases.
One of the biggest features of the Zapstore is the fact that developers can cryptographically sign their app releases using their Nostr keys, so you know that the app you are downloading is the one they actually released and hasn't been altered in any way. The Zapstore will warn you and won't let you install the app if the signature is invalid.
Getting Started
Since the Zapstore will be the source we use for installing most of the other apps mentioned, we will start with installing the Zapstore.
We will then use the Zapstore to install Amber and set it up with our Nostr account, either by creating a new private key, or by importing one we already have. We'll also use it to log into the Zapstore.
Next, we will install Amethyst from the Zapstore and log into it via Amber.
After this, we will install Citrine from the Zapstore and add it as a local relay on Amethyst.
Because we want to be able to send and receive zaps, we will set up a wallet with CoinOS and connect it to Amethyst and the Zapstore using Nostr Wallet Connect.
Finally, we will install Pokey using the Zapstore, log into it using Amber, and set up the notifications we want to receive.
By the time you are done with this series, you will have a great head-start on your Nostr journey compared to muddling through it all on your own. Moreover, you will have developed a familiarity with how things generally work on Nostr that can be applied to other apps you try out in the future.
Continue to Part 2: The Zapstore. Nostr Link: naddr1qv…y5au


In this second installment of The Android Elite Setup tutorial series, we will cover installing the Zapstore (npub10r8…t2p8) on your #Android device and browsing for apps you may be interested in trying out.
Since the #Zapstore is a direct competitor to the Google Play Store, you're not going to be able to find and install it from there like you may be used to with other apps. Instead, you will need to install it directly from the developer's GitHub page. This is not a complicated process, but it is outside the normal flow of searching on the Play Store, tapping install, and you're done.
Installation
From any web browser on your Android phone, navigate to the Zapstore GitHub Releases page and the most recent version will be listed at the top of the page. The .apk file for you to download and install will be listed in the "Assets."
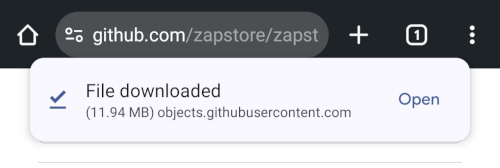
Tap the .apk to download it, and you should get a notification when the download has completed, with a prompt to open the file.
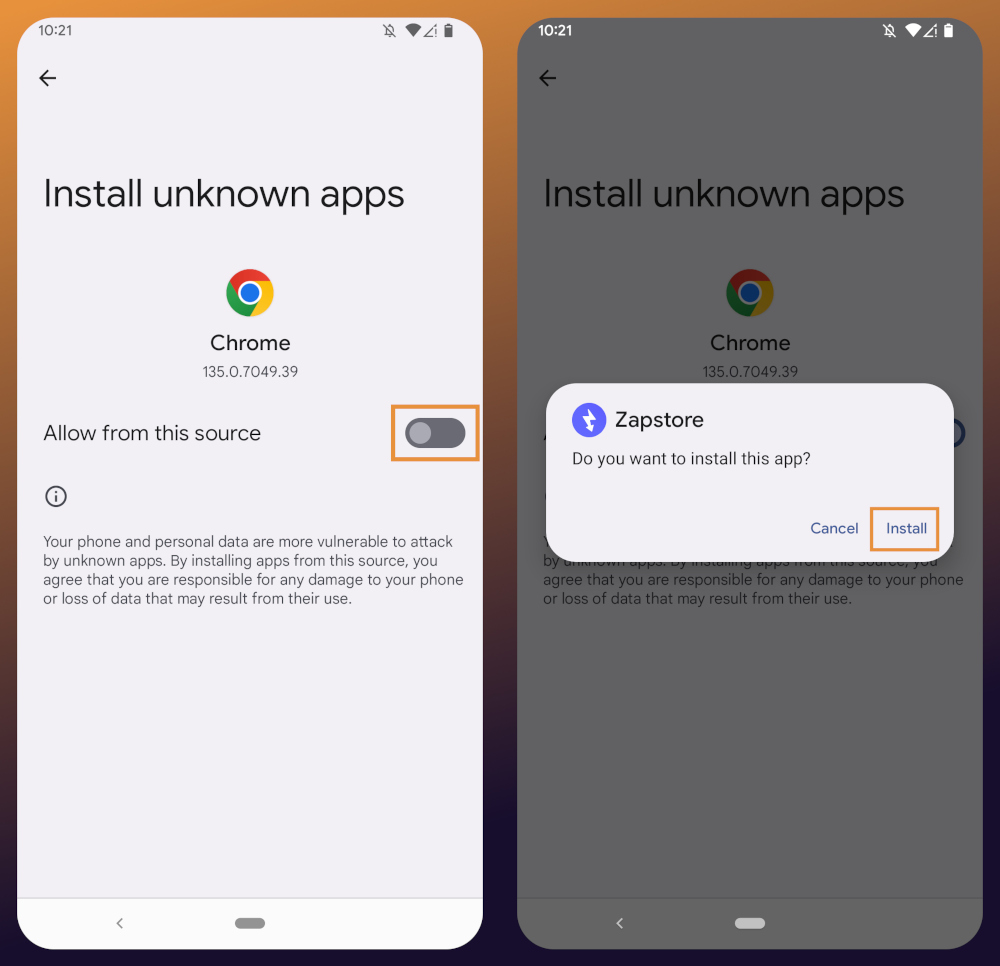
You will likely be presented with a prompt warning you that your phone currently isn't allowed to install applications from "unknown sources." Anywhere other than the Play Store is considered an "unknown source" by default. However, you can manually allow installation from unknown sources in the settings, which the prompt gives you the option to do.
In the settings page that opens, toggle it to allow installation from this source, and you should be prompted to install the application. If you aren't, simply go to your web browser's downloads and tap on the .apk file again, or go into your file browser app and you should find the .apk in your Downloads folder.
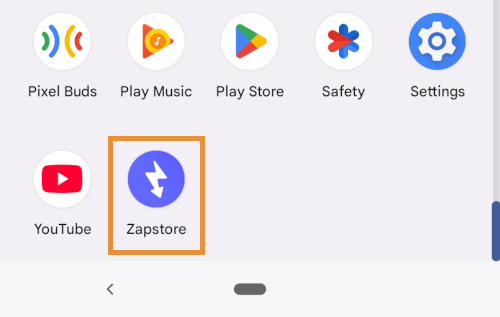
If the application doesn't open automatically after install, you will find it in your app drawer.
Home Page
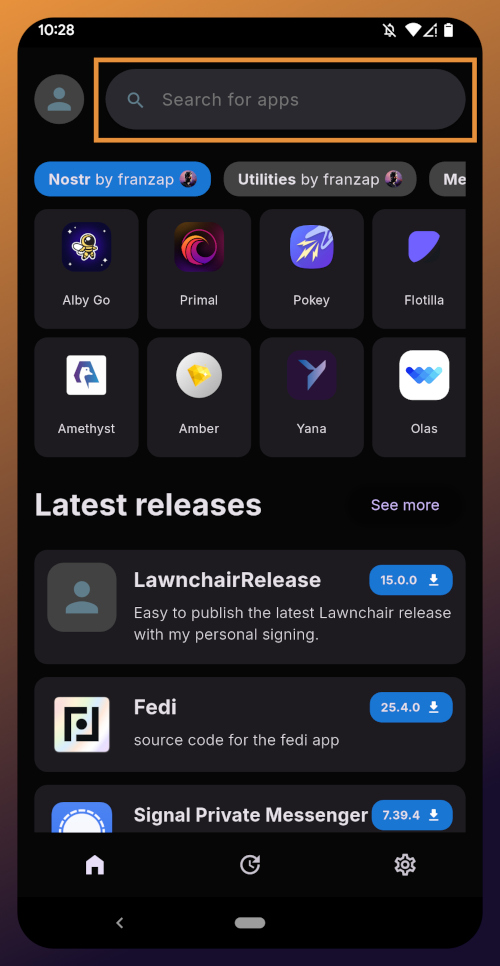
Right at the top of the home page in the Zapstore is the search bar. You can use it to find a specific app you know is available in the Zapstore.
There are quite a lot of open source apps available, and more being added all the time. Most are added by the Zapstore developer, franzap (npub1wf4…dgh9), but some are added by the app developers themselves, especially Nostr apps. All of the applications we will be installing through the Zapstore have been added by their developers and are cryptographically signed, so you know that what you download is what the developer actually released.
The next section is for app discovery. There are curated app collections to peruse for ideas about what you may want to install. As you can see, all of the other apps we will be installing are listed in franzap (npub1wf4…dgh9)'s "Nostr" collection.
In future releases of the Zapstore, users will be able to create their own app collections.
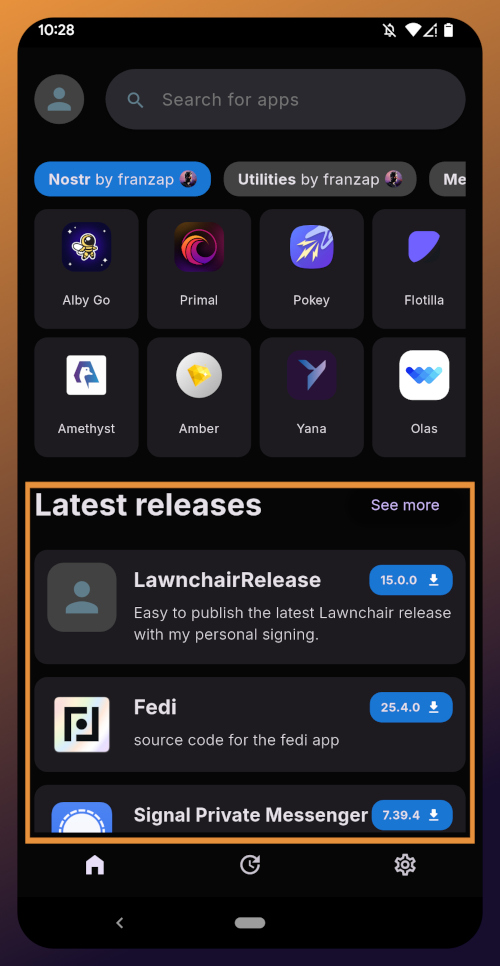
The last section of the home page is a chronological list of the latest releases. This includes both new apps added to the Zapstore and recently updated apps. The list of recent releases on its own can be a great resource for discovering apps you may not have heard of before.
Installed Apps
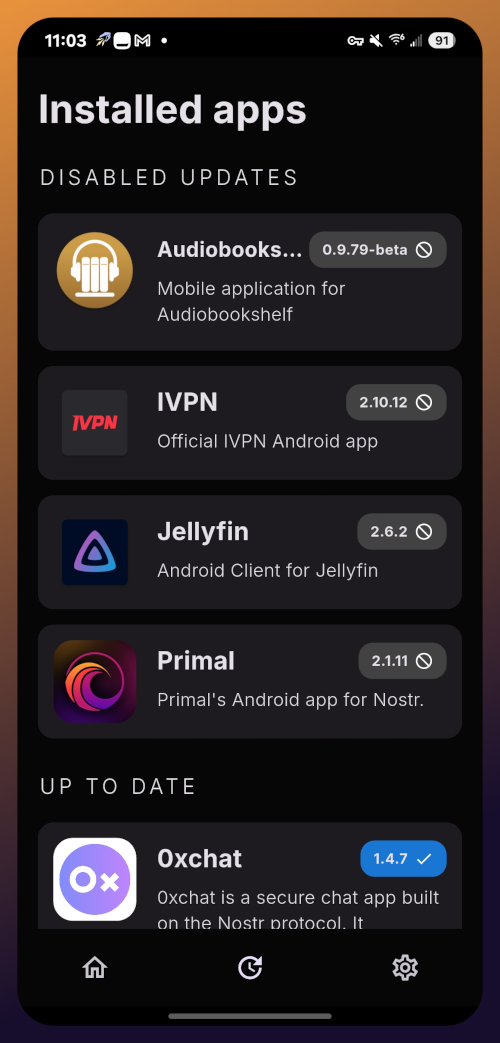
The next page of the app, accessed by the icon in the bottom-center of the screen that looks like a clock with an arrow circling it, shows all apps you have installed that are available in the Zapstore. It's also where you will find apps you have previously installed that are ready to be updated. This page is pretty sparse on my test profile, since I only have the Zapstore itself installed, so here is a look at it on my main profile:
The "Disabled Apps" at the top are usually applications that were installed via the Play Store or some other means, but are also available in the Zapstore. You may be surprised to see that some of the apps you already have installed on your device are also available on the Zapstore. However, to manage their updates though the Zapstore, you would need to uninstall the app and reinstall it from the Zapstore instead. I only recommend doing this for applications that are added to the Zapstore by their developers, or you may encounter a significant delay between a new update being released for the app and when that update is available on the Zapstore.
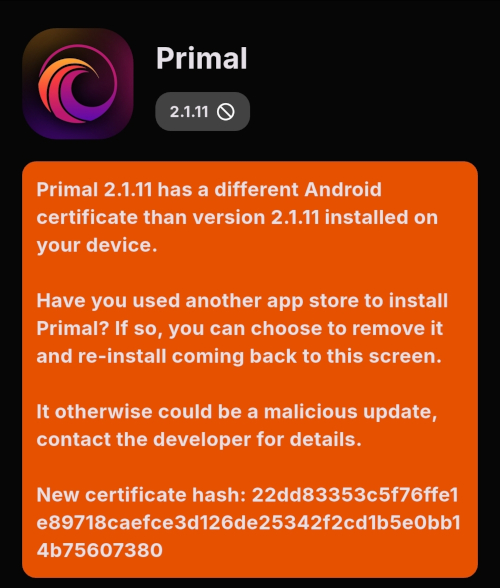
Tap on one of your apps in the list to see whether the app is added by the developer, or by the Zapstore. This takes you to the application's page, and you may see a warning at the top if the app was not installed through the Zapstore.
Scroll down the page a bit and you will see who signed the release that is available on the Zapstore.
In the case of Primal, even though the developer is on Nostr, they are not signing their own releases to the Zapstore yet. This means there will likely be a delay between Primal releasing an update and that update being available on the Zapstore.
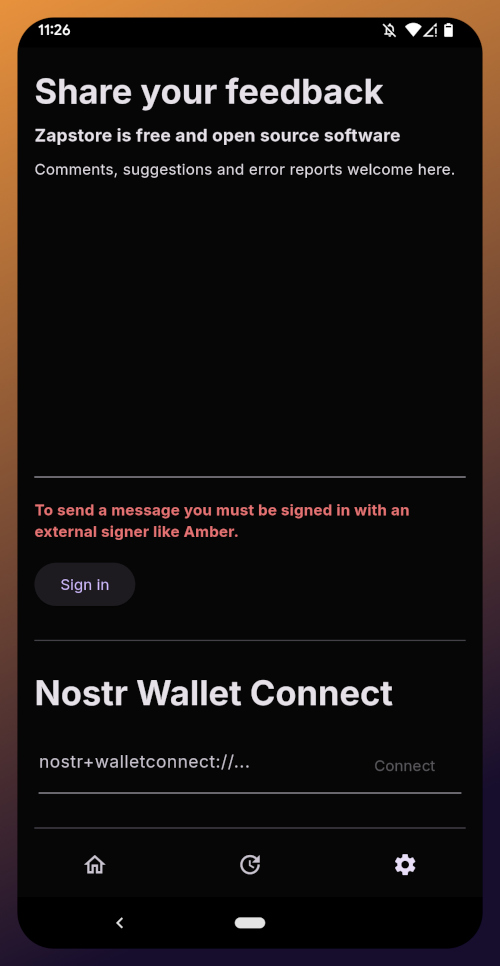
Settings
The last page of the app is the settings page, found by tapping the cog at the bottom right.
Here you can send the Zapstore developer feedback directly (if you are logged in), connect a Lightning wallet using Nostr Wallet Connect, delete your local cache, and view some system information.
We will be adding a connection to our OVO (npub1h2q…w8ch) wallet in part 5 of this tutorial series.
For the time being, we are all set with the Zapstore and ready for the next stage of our journey.
Continue to Part 3: Amber Signer. Nostr link: naddr1qq…0nug

quoting
naddr1qq…dyv4Your identity is important to you, right? While impersonation can be seen in some senses as a form of flattery, we all would prefer to be the only person capable of representing ourselves online, unless we intentionally delegate that privilege to someone else and maintain the ability to revoke it.
#Amber does all of that for you in the context of #Nostr. It minimizes the possibility of your private key being compromized by acting as the only app with access to it, while all other Nostr apps send requests to Amber when they need something signed. This even allows you to give someone temporary authority to post as you without giving them your private key, and you retain the authority to revoke their permissions at any time.
greenart7c3 (npub1w4u…0jr5) has provided Android users with an incredibly powerful tool in Amber, and he continues to improve its functionality and ease of use. Indeed, there is not currently a comparative app available for iOS users. For the time being, this superpower is exclusive to Android.
Installation
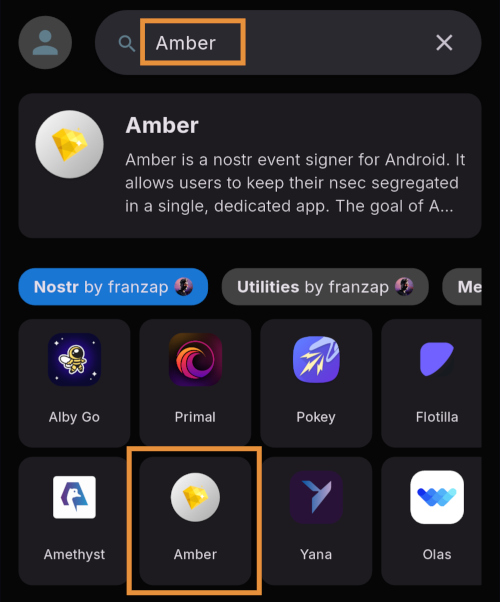
Open up the Zapstore app that you installed in the previous stage of this tutorial series.
Very likely, Amber will be listed in the app collection section of the home page. If it is not, just search for "Amber" in the search bar.
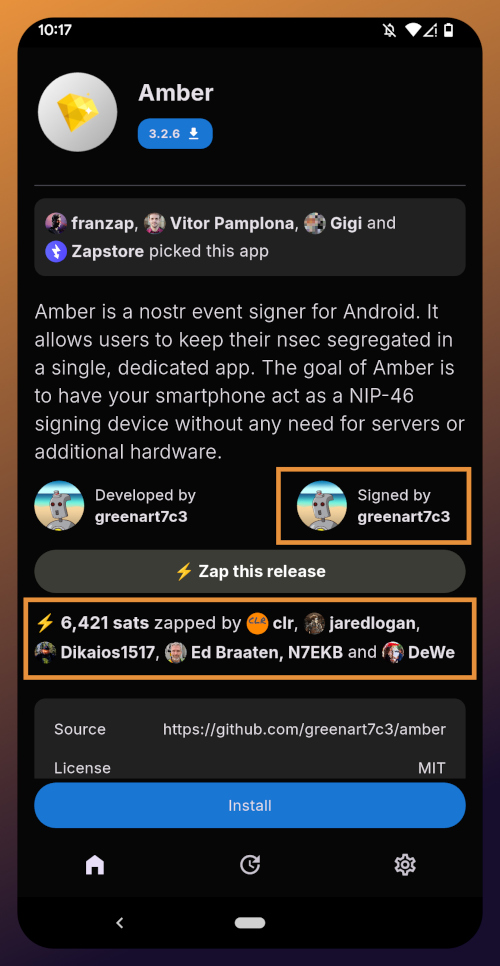
Opening the app's page in the Zapstore shows that the release is signed by the developer. You can also see who has added this app to one of their collections and who has supported this app with sats by zapping the release.
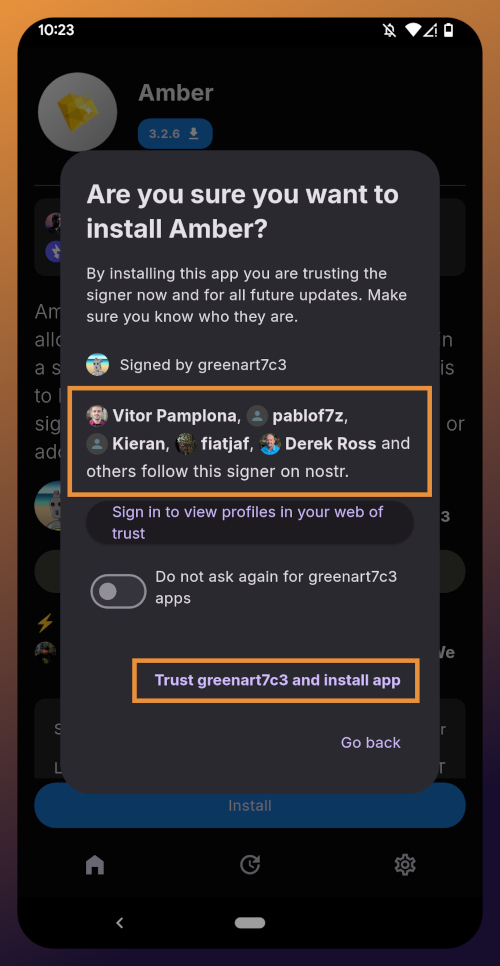
Tap "Install" and you will be prompted to confirm you are sure you want to install Amber.
Helpfully, you are informed that several other users follow this developer on Nostr. If you have been on Nostr a while, you will likely recognize these gentlemen as other Nostr developers, one of them being the original creator of the protocol.
You can choose to never have Zapstore ask for confirmation again with apps developed by greenart7c3 (npub1w4u…0jr5), and since we have another of his apps to install later in this tutorial series, I recommend you toggle this on. Then tap on "Trust greenart7c3 and install app."
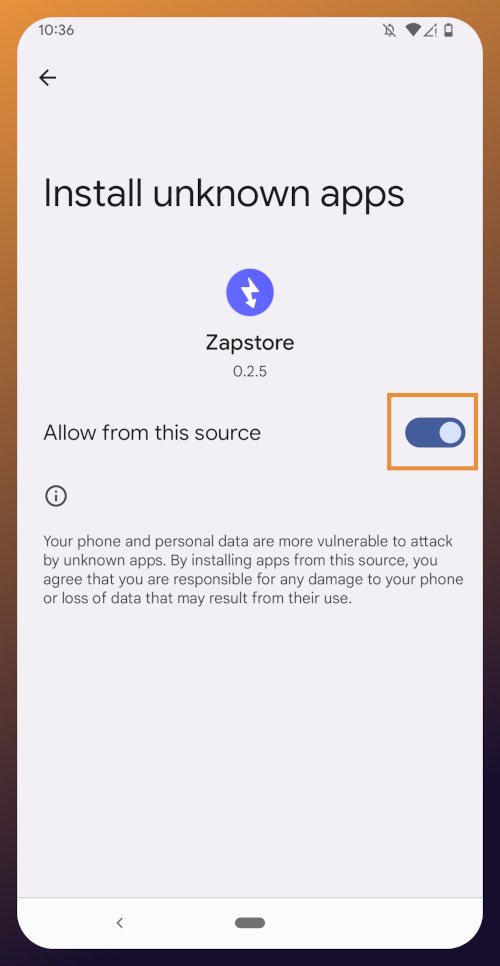
Just like when you installed the Zapstore from their GitHub, you will be prompted to allow the Zapstore to install apps, since Android considers it an "unknown source."
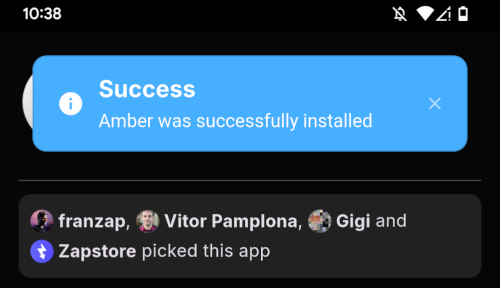
Once you toggle this on and use the back button to get back to the Zapstore, Amber will begin downloading and then present a prompt to install the app. Once installed, you will see a prompt that installation was a success and you can now open the app.
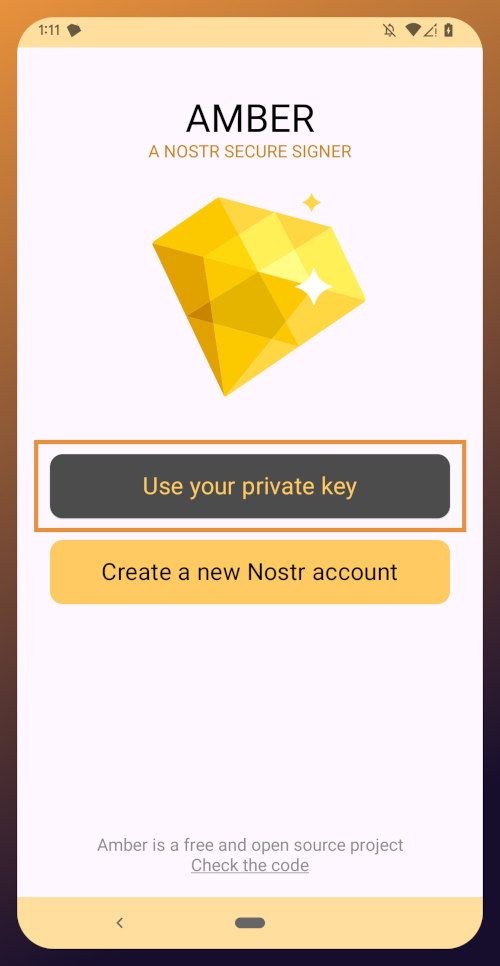
From here, how you proceed will depend on whether you need to set up a new Nostr identity or use Amber with an existing private key you already have set up. The next section will cover setting up a new Nostr identity with Amber. Skip to the section titled "Existing Nostrich" if you already have an nsec that you would like to use with Amber.
New Nostrich
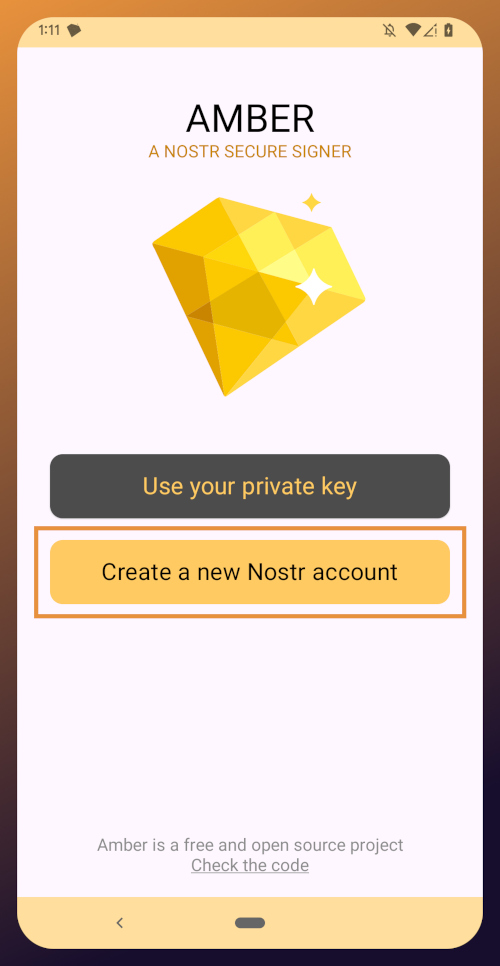
Upon opening the application, you will be presented with the option to use an existing private key or create a new Nostr account. Nostr doesn't really have "accounts" in the traditional sense of the term. Accounts are a relic of permissioned systems. What you have on Nostr are keys, but Amber uses the "account" term because it is a more familiar concept, though it is technically inaccurate.
Choose "Create a new Nostr account" and you will be presented with a screen telling you that your Nostr account is ready. Yes, it was really that easy. No email, no real name, no date of birth, and no annoying capcha. Just "Create a new account" and you're done.
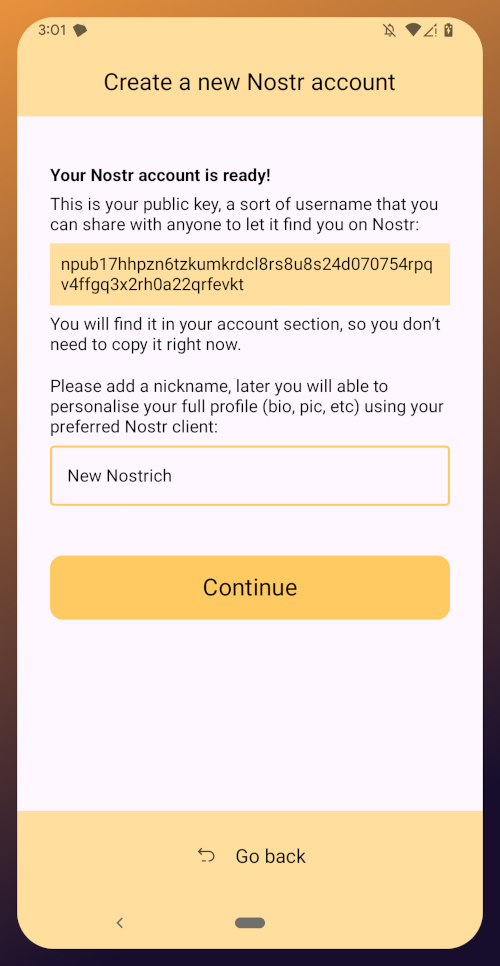
The app presents you with your public key. This is like an address that can be used to find your posts on Nostr. It is 100% unique to you, and no one else can post a note that lists this npub as the author, because they won't have the corresponding private key. You don't need to remember your npub, though. You'll be able to readily copy it from any Nostr app you use whenever you need it.
You will also be prompted to add a nickname. This is just for use within Amber, since you can set up multiple profiles within the app. You can use anything you want here, as it is just so you can tell which profile is which when switching between them in Amber.
Once you've set your nickname, tap on "Continue."
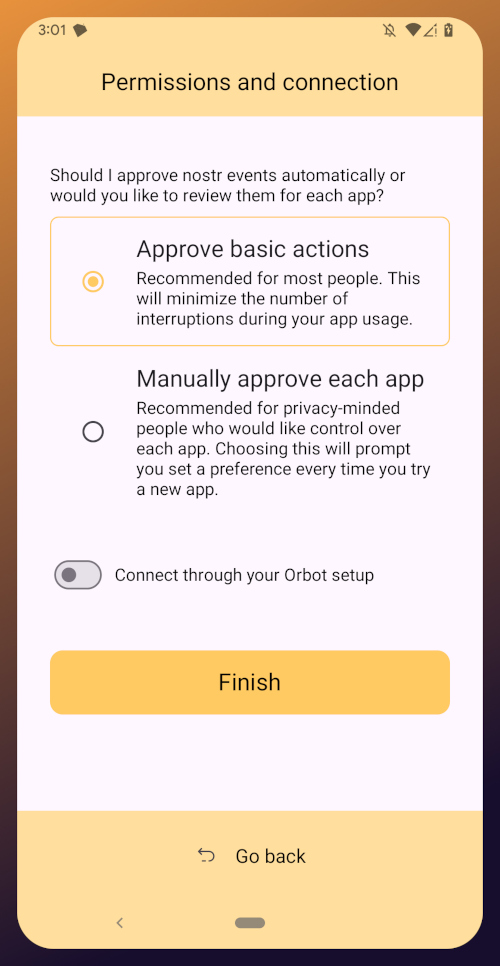
The next screen will ask you what Amber's default signing policy should be.
The default is to approve basic actions, referring to things that are common for Nostr clients to request a signature for, like following another user, liking a post, making a new post, or replying. If you are more concerned about what Amber might be signing for on your behalf, you can tell it to require manual approval for each app.
Once you've made your decision, tap "Finish." You will also be able to change this selection in the app settings at any time.
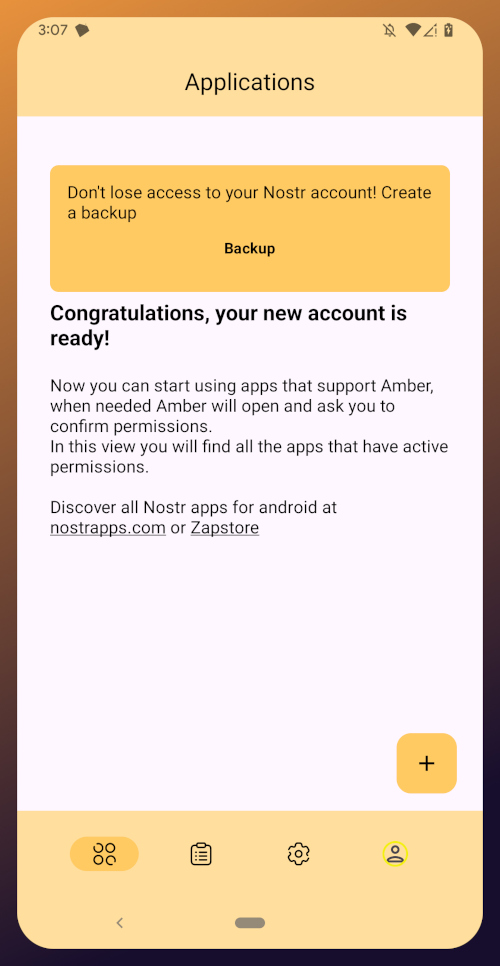
With this setup out of the way, you are now presented with the main "Applications" page of the app.
At the top, you have a notification encouraging you to create a backup. Let's get that taken care of now by tapping on the notification and skipping down to the heading titled "Backing Up Your Identity" in this tutorial.
Existing Nostrich
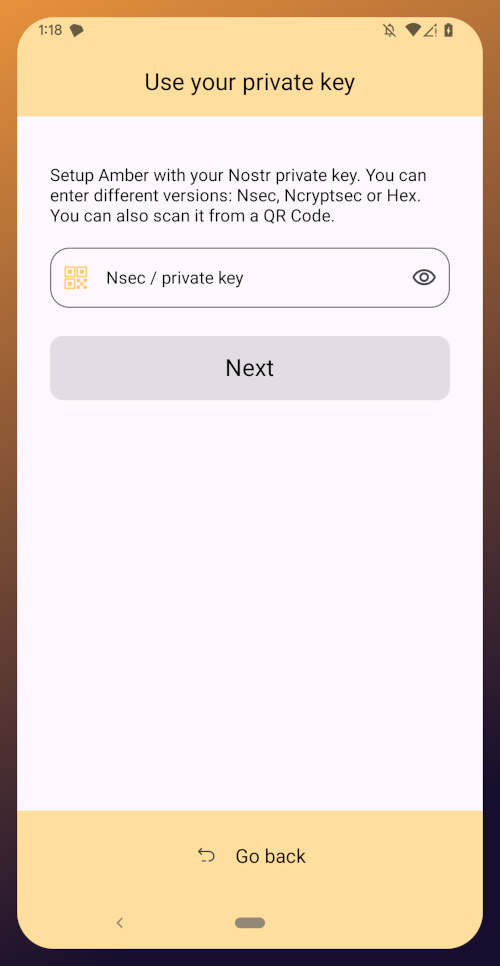
Upon opening the application, you will be presented with the option to use your private key or create a new Nostr account. Choose the former.
The next screen will require you to paste your private key.
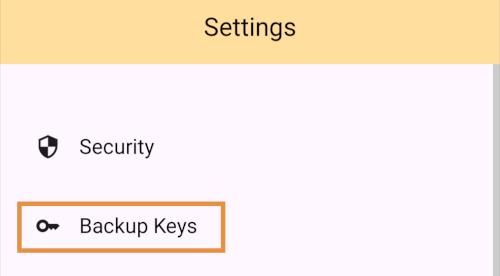
You will need to obtain this from whatever Nostr app you used to create your profile, or any other Nostr app that you pasted your nsec into in the past. Typically you can find it in the app settings and there will be a section mentioning your keys where you can copy your nsec. For instance, in Primal go to Settings > Keys > Copy private key, and on Amethyst open the side panel by tapping on your profile picture in the top-left, then Backup Keys > Copy my secret key.
After pasting your nsec into Amber, tap "Next."
Amber will give you a couple options for a default signing policy. The default is to approve basic actions, referring to things that are common for Nostr clients to request a signature for, like following another user, liking a post, making a new post, or replying. If you are more concerned about what Amber might be signing for on your behalf, you can tell it to require manual approval for each app.
Once you've made your decision, tap "Finish." You will also be able to change this selection in the app settings at any time.
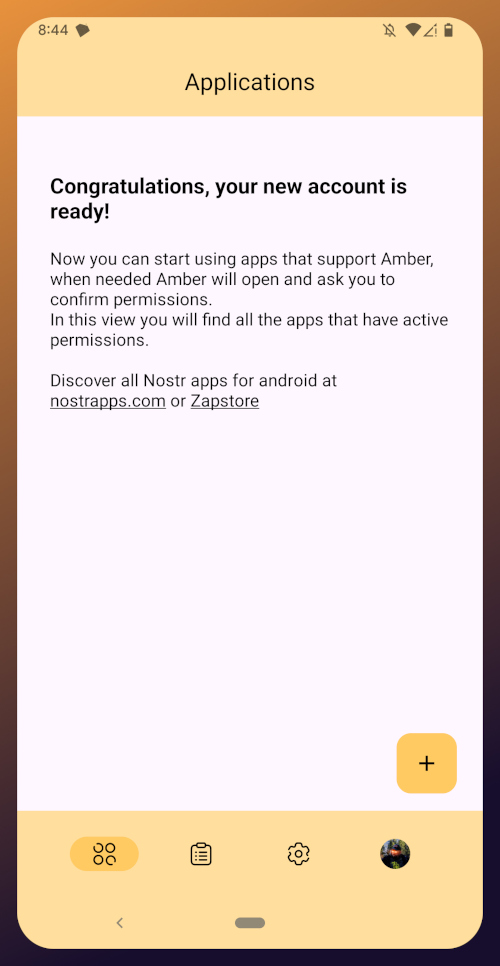
With this setup out of the way, you are now presented with the main "Applications" page of the app. You have nothing here yet, since you haven't used Amber to log into any Nostr apps, but this will be where all of the apps you have connected with Amber will be listed, in the order of the most recently used at the top.
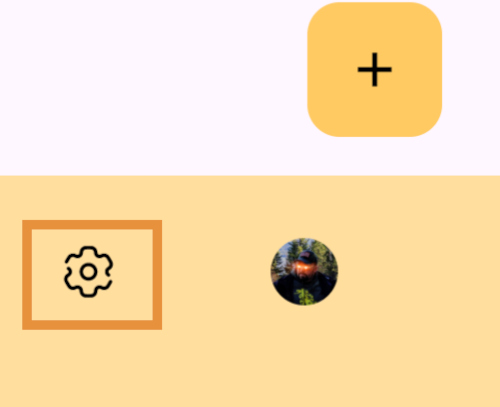
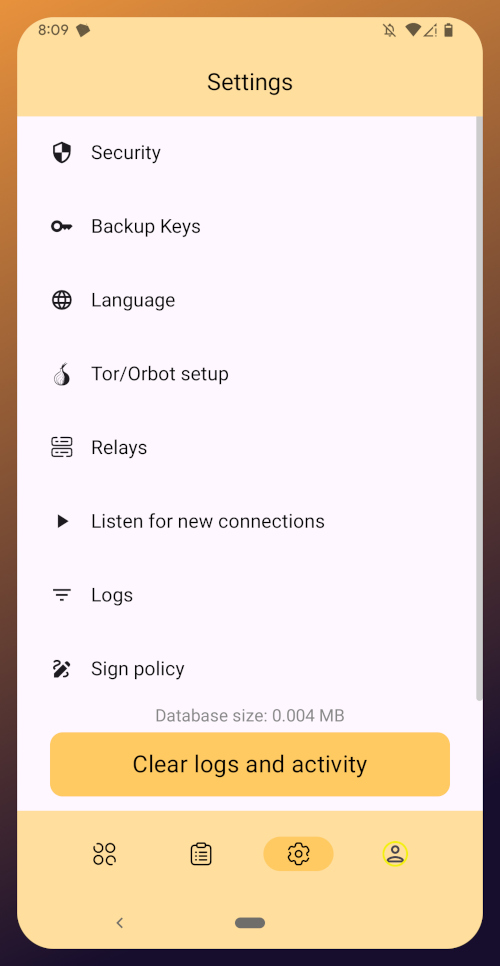
Before we go and use Amber to log into an app, though, let's make sure we've created a backup of our private key. You pasted your nsec into Amber, so you could just save that somewhere safe, but Amber gives you a few other options as well. To find them, you'll need to tap the cog icon at the bottom of the screen to access the settings, then select "Backup Keys."
Backing Up Your Identity
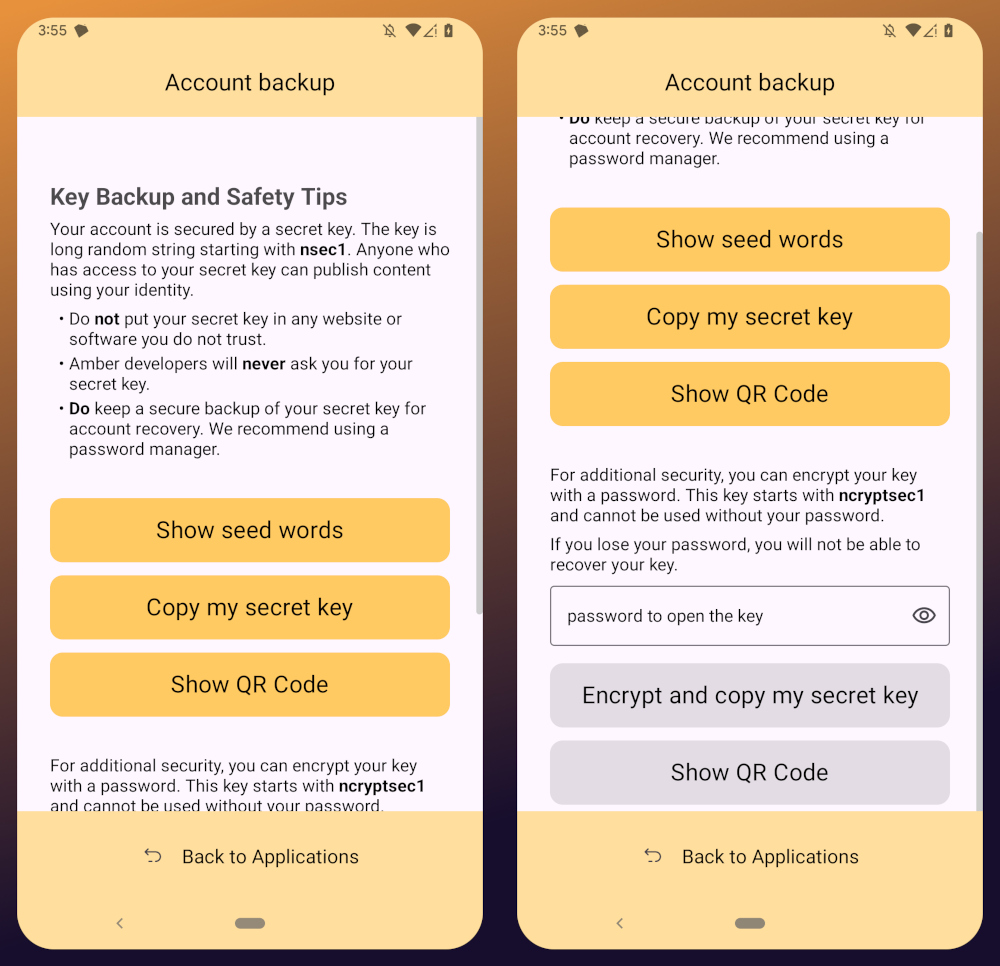
You'll notice that Amber has a few different options for backing up your private key that it can generate.
First, it can give you seed words, just like a Bitcoin seed. If you choose that option, you'll be presented with 12 words you can record somewhere safe. To recover your Nostr private key, you just have to type those words into a compatible application, such as Amber.
The next option is to just copy the secret/private key in its standard form as an "nsec." This is the least secure way to store it, but is also the most convenient, since it is simple to paste into another signer application. If you want to be able to log in on a desktop web app, the browser extension Nostr signers won't necessarily support entering your 12 word seed phrase, but they absolutely will support pasting in your nsec.
You can also display a QR code of your private key. This can be scanned by Amber signer on another device for easily transferring your private key to other devices you want to use it on. Say you have an Android tablet in addition to your phone, for instance. Just make sure you only use this function where you can be certain that no one will be able to get a photograph of that QR code. Once someone else has your nsec, there is no way to recover it. You have to start all over on Nostr. Not a big deal at this point in your journey if you just created a Nostr account, but if you have been using Nostr for a while and have built up a decent amount of reputation, it could be much more costly to start over again.
The next options are a bit more secure, because they require a password that will be used to encrypt your private key. This has some distinct advantages, and a couple disadvantages to be aware of. Using a password to encrypt your private key will give you what is called an ncryptsec, and if this is leaked somehow, whoever has it will not necessarily have access to post as you on Nostr, the way they would if your nsec had been leaked. At least, not so long as they don't also have your password. This means you can store your ncryptsec in multiple locations without much fear that it will be compromised, so long as the password you used to encrypt it was a strong and unique one, and it isn't stored in the same location. Some Nostr apps support an ncryptsec for login directly, meaning that you have the option to paste in your ncryptsec and then just log in with the password you used to encrypt it from there on out. However, now you will need to keep track of both your ncryptsec and your password, storing both of them safely and separately. Additionally, most Nostr clients and signer applications do not support using an ncryptsec, so you will need to convert it back to a standard nsec (or copy the nsec from Amber) to use those apps.
The QR option using an ncryptsec is actually quite useful, though, and I would go this route when trying to set up Amber on additional devices, since anyone possibly getting a picture of the QR code is still not going to be able to do anything with it, unless they also get the password you used to encrypt it.
All of the above options will require you to enter the PIN you set up for your device, or biometric authentication, just as an additional precaution before displaying your private key to you.
As for what "store it in a safe place" looks like, I highly recommend a self-hosted password manager, such as Vaultwarden+Bitwarden or KeePass. If you really want to get wild, you can store it on a hardware signing device, or on a steel seed plate.
Additional Settings
Amber has some additional settings you may want to take advantage of. First off, if you don't want just anyone who has access to your phone to be able to approve signing requests, you can go into the Security settings add a PIN or enable biometrics for signing requests. If you enable the PIN, it will be separate from the PIN you use to access your phone, so you can let someone else use your phone, like your child who is always begging to play a mobile game you have installed, without worrying that they might have access to your Nostr key to post on Amethyst.
Amber also has some relay settings. First are the "Active relays" which are used for signing requests sent to Amber remotely from Nostr web apps. This is what enables you to use Amber on your phone to log into Nostr applications on your desktop web browser, such as Jumble.social, Coracle.social, or Nostrudel.ninja, eliminating your need to use any other application to store your nsec whatsoever. You can leave this relay as the default, or you can add other relays you want to use for signing requests. Just be aware, not all relays will accept the notes that are used for Nostr signing requests, so make sure that the relay you want to use does so. In fact, Amber will make sure of this for you when you type in the relay address.
The next type of relays that you can configure in Amber are the "Default profile relays." These are used for reading your profile information. If you already had a Nostr identity that you imported to Amber, you probably noticed it loaded your profile picture and display name, setting the latter as your nickname in Amber. These relays are where Amber got that information from. The defaults are relay.nostr.band and purplepag.es. The reason for this is because they are aggregators that look for Nostr profiles that have been saved to other relays on the network and pull them in. Therefore, no matter what other relay you may save your profile to, Amber will likely be able to find it on one of those two relays as well. If you have a relay you know you will be saving your Nostr profiles to, you may want to add it to this list.
You can also set up Amber to be paired with Orbot for signing over Tor using relays that are only accessible via the Tor network. That is an advanced feature, though, and well beyond the scope of this tutorial.
Finally, you can update the default signing policy. Maybe after using Amber for a while, you've decided that the choice you made before was too strict or too lenient. You can change it to suit your needs.
Zapstore Login
Now that you are all set up with Amber, let's get you signed into your first Nostr app by going back to the Zapstore.
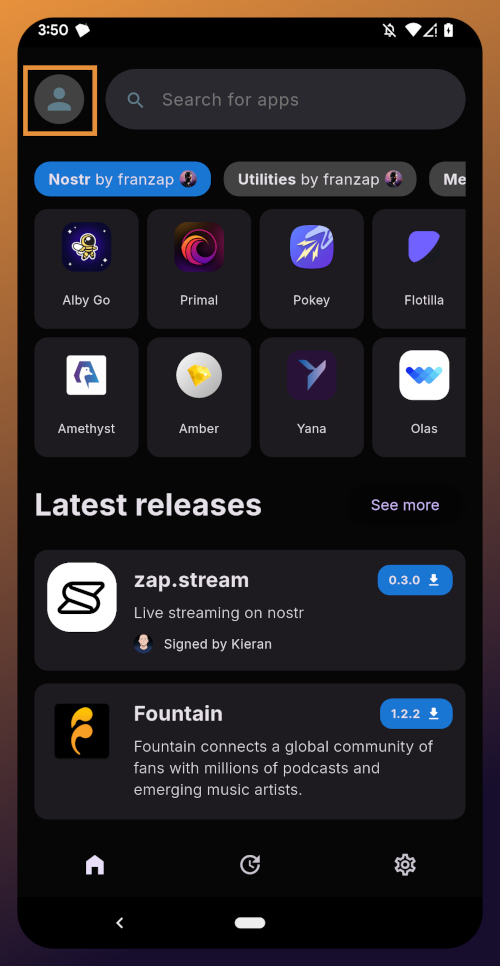
From the app's home screen, tap on the user icon in the upper left of the screen. This will open a side panel with not much on it except the option to "sign in." Go ahead and tap on it.
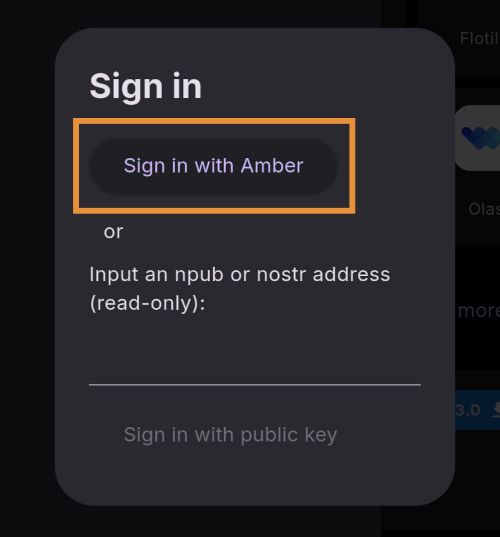
You will be presented with the option to either sign in with Amber, or to paste your npub. However, if you do the latter, you will only have read access, meaning you cannot zap any of the app releases. There are other features planned for the Zapstore that may also require you to be signed in with write access, so go ahead and choose to log in with Amber.
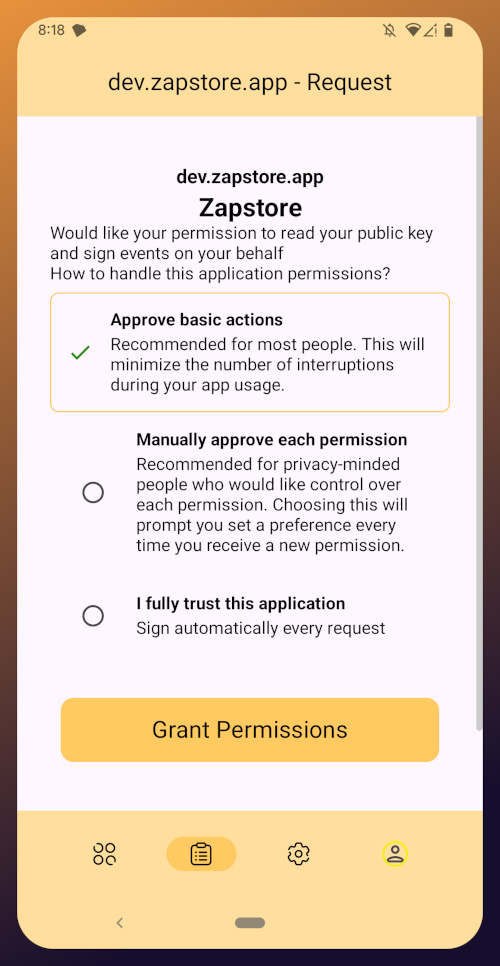
Your phone should automatically switch to Amber to approve the sign-in request.
You can choose to only approve basic actions for Zapstore, require it to manually approve every time, or you can tell it that you "fully trust this application." Only choose the latter option with apps you have used for a while and they have never asked you to sign for anything suspicious. For the time being, I suggest you use the "Approve basic actions" option and tap "Grant Permissions."
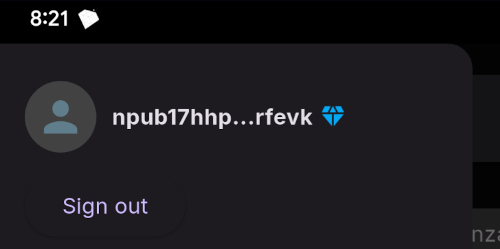
Your phone will switch back to the Zapstore and will show that you are now signed in. Congratulations! From here on out, logging into most Nostr applications will be as easy as tapping on "Log in with Amber" and approving the request.
If you set up a new profile, it will just show a truncated version of your npub rather than the nickname you set up earlier. That's fine. You'll have an opportunity to update your Nostr profile in the next tutorial in this series and ensure that it is spread far and wide in the network, so the Zapstore will easily find it.
That concludes the tutorial for Amber. While we have not covered using Amber to log into Nostr web apps, that is outside the scope of this series, and I will cover it in an upcoming tutorial regarding using Amber's remote signer options in detail.
Since you're already hanging out in the Zapstore, you may as well stick around, because we will be using it right out the gate in the next part of this series: Amethyst Installation and Setup. (Coming Soon)